Art in the Home
|
|
As a result of our efforts to maintain our level of artistic learning from home during our county mandated school closings, please use the following grade level activities for suggested art based learning opportunities presented as long term projects. For additional general online resources, activities, worksheets, and reference sites, please visit my "Supplemental At Home Activities K-5" page from the menu above
|
Welcome, parents and artists! Below you will find our 3-5 grade level projects. As per administration, projects will now be considered long term so you can prioritize your coursework as you see necessary. Hopefully this will encourage students to revisit their art throughout this period and work at a comfortable pace. Feel free to make the projects as simple or elaborate depending on your needs, time, and available resources. These projects are meant to foster creativity, encourage use of fine motor skills, and be a fun break from your daily activities.
Requirements: Projects will be posted every three weeks to provide enough time to complete activities to the best of your abilities at your personal convenience and leisure. Project details and due dates are posted under your grade level column, and a submission button to upload your project to our grade level shared google folder is at the bottom of the project description. If you have trouble uploading your work, there is a tutorial at the very bottom of this page. If you have any further questions, please email me at [email protected]. Happy art making!
Requirements: Projects will be posted every three weeks to provide enough time to complete activities to the best of your abilities at your personal convenience and leisure. Project details and due dates are posted under your grade level column, and a submission button to upload your project to our grade level shared google folder is at the bottom of the project description. If you have trouble uploading your work, there is a tutorial at the very bottom of this page. If you have any further questions, please email me at [email protected]. Happy art making!
***Cresskill Environmental Poster Contest Update
Winners have been selected from each school. Congratulations to all the winners and thank you to all participants! ALL of your posters make a difference in creating an awareness of the issues facing our environment.
CEC 2020 Poster Winners:
EHB
Miyu Oishi 3N
Jiwon Jung 3S
Hadar Rozen 4D
Daniel Choi 4S
Joshua Lee 5W
Hannah Jamieson 5Z
MMS
Kevin Kim 3R
Jasmine Ambartsumyan 3R
Hannah Barrs 4M
Yeeun Kim 4G
Ellie Green 5H
Nathanael Gonzalez 5H
Third Grade |
Fourth Grade |
Fifth Grade |
Project for May 26-June 12
3rd, 4th, and 5th graders will all be participating in the same project for this next unit.
PROJECT TITLE: Mimicking the Masters
The following assignment has been adapted from a challenge presented by The Getty Museum
Since visiting an art museum isn’t possible at this time, The Getty Museum of LA came up with a way to keep us engaged by challenging everyone to recreate famous works of art. Here is your opportunity to have a little fun and get creative, while exploring a bit of art history. This assignment will encourage you to observe elements and details of art closely, critique artwork, explore composition, brainstorm best approaches, and think outside the box for your recreations.
ASSIGNMENT: Recreate a Famous Artwork!
Materials: yourself (or family members), camera, found household objects; art supplies of your choice (if you plan to draw or paint)
PROCEDURES: The task is to choose any popular or famous painting or artwork and create a replica, then snap a picture of your recreation!
You have three options:
Recreate a portrait: Find a famous artwork of a person and dress up and pose in a similar way. You can be the subject or make your family (or pets) the subject depending on the artwork you choose. Be creative with your materials for outfits, backgrounds, and accessories.
Recreate using household items: You can use household objects, toys, foods, fabrics, and materials to recreate art pieces that are abstract or don’t feature a person. Arrange items in a creative way to create a still life of the art.
Recreate with art supplies: Pretend to be the famous artist! Draw, paint, collage, or sculpt your own version of the artwork you choose. It does not need to look exactly like the original, but should have similarities.
Where can I find famous works of art? Check out the museum site links below, or just try a Google Image search for famous art. Please ask your parents to supervise your searches.
MOMA Kids
Tate Kids
NGA for kids
The Met
The Getty
Indianapolis Museum
Art Institute of Chicago
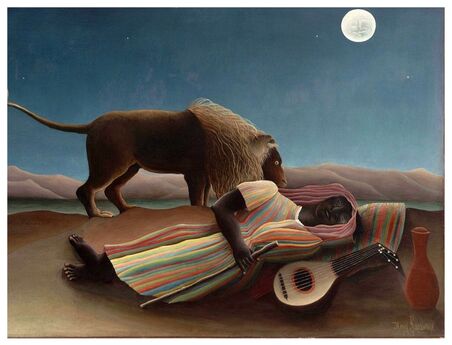
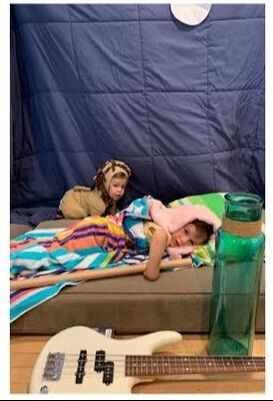
Here is the Ramsden family’s interpretation of this project! We recreated The Sleeping Gypsy by Henri Rousseau. And maybe it's just me, but I think we totally nailed it!!
|
|
Still struggling for ideas? Check out the slideshow below for some creative sample recreations done by other participants!
SUBMISSION:
When submitting, try to include a side by side of the original art piece and your version. If you are having trouble submitting, please scroll to the bottom of this page for a tutorial on uploading to google drive.
When submitting, try to include a side by side of the original art piece and your version. If you are having trouble submitting, please scroll to the bottom of this page for a tutorial on uploading to google drive.
Third Grade |
4th Grade |
5th Grade |
May 4- May 22
|
May 4- May 22
|

|
|
|
SUBMISSION: DUE MAY 24
Please take a picture of your art. You may add your image to the shared google drive folder by clicking on the following links
MMS submit here
EHB submit here
***Having trouble submitting? Scroll to the very bottom of this page for a tutorial.
Please take a picture of your art. You may add your image to the shared google drive folder by clicking on the following links
MMS submit here
EHB submit here
***Having trouble submitting? Scroll to the very bottom of this page for a tutorial.
April 3- April 30
Due May 1
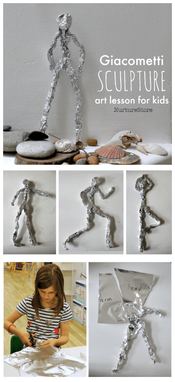
PROJECT: GIACOMETTI FIGURE SCULPTURES
Due May 1
PROJECT: GIACOMETTI FIGURE SCULPTURES

|
|
ASSIGNMENT: Create a foil sculpture of a human figure in "motion"
Materials: aluminum foil (or play doh/clay); scissors; Optional: dark acrylic paint or polish
Alberto Giacometti (1901-1966) was a drawer, painter, and sculptor from Switzerland who explored many different styles of art throughout his lifetime. He is best known for his elongated (tall), human figures made of bronze.
Observe Giacometti’s figures at the MOMA here
Watch the videos below to see the exhibit at the Tate, and to see Giacometti at work creating his art
After you're finished viewing, think about the following questions and maybe discuss with a family member.
What words would you use to describe his figure sculptures?
How does Giacometti express emotions through his figures?
What textures do you see? Why do you think he chose to create them this way?
Why do you think Giacometti made the limbs and bodies of his sculptures so long, thin, and almost frail looking… but his sculptures are made of super strong metal?
What is your opinion of Giacometti’s sculptures?
What feelings do you get when you look at them?
PROCEDURES:
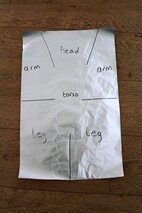
PLAN: on a piece of scrap paper, sketch out some stick figures in different positions. Since these figures have no facial expressions, to create emotions and feelings through body language and posture. Sketch some of your stick figures performing activities (dancing, kicking a ball)
Check out my tutorial below to get started:
CREATE:
-Rip a long piece of aluminum foil (the length of your foil will generally be how tall your figure will be)
-Cut your foil as depicted in the illustration.
-Gather each section crumpling and shaping the foil until it is bumpy and thin. Shape your foil until it resembles a stick figure. (add strips of foil to any parts of your sculpture if you need more)
-Position your figure.
Use a ball of play doh for a base to make it stand.
OPTIONAL: Use black or dark acrylic paint, nail polish, or shoe polish to brush some darker shades onto your sculpture. This will bring out the texture of your work and resemble Giacometti’s brushed bronze work
EXTENSION ACTIVITIES:
(optional) Find other materials to create human figures and challenge yourself to consider posture, body language, expression, and movement. Consider shaping clay or play doh, or attaching various materials together to make a sculpture of the human figure such as legos.
SUBMISSION:
submit a photo of your sculpture to the shared google folder here
Be sure to label your submission with your name and class.
***Having trouble submitting? Scroll to the very bottom of this page for a tutorial.
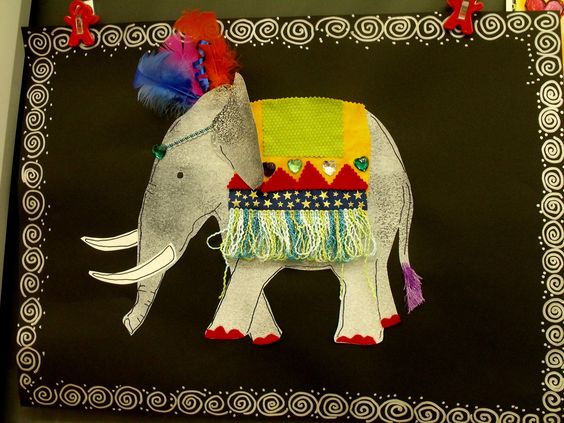
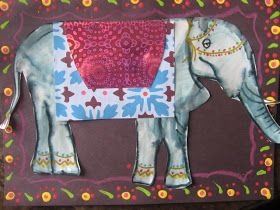
Curriculum Overview: Our 4th grade artists are learning about art history and movements of art history. Projects are centered around different styles of art from different time periods, and reflect the work of significant artists from these different genres.
May 4- May 22
Due May 24
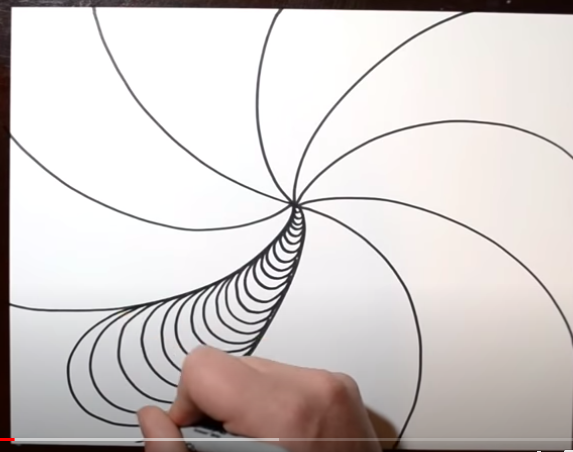
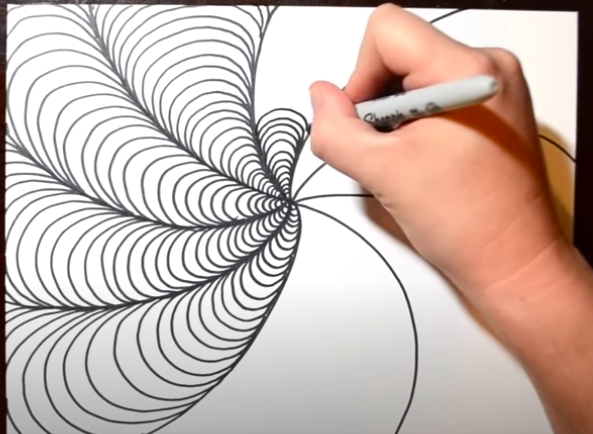
PROJECT: 3D Doodle Cube
Materials: 4 sheets of 8.5x11 paper; ruler, scissors, glue, coloring materials or black marker
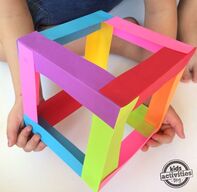
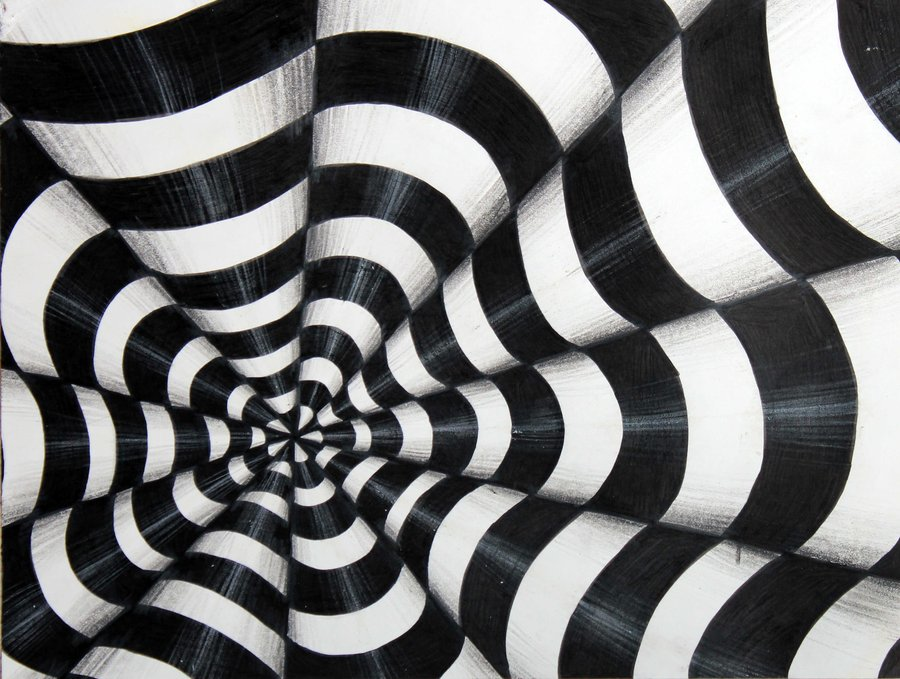
ASSIGNMENT: create a zentangle patterned 3D cube sculpture!
Zentangles are a calming way of doodling simple patterns to help people deal with stress and enhance creativity. You will be using this zentangle method to decorate the paper that you will use to create a cube sculpture. Begin by watching this video describing the art of ZENTANGLES:
Zentangles are a calming way of doodling simple patterns to help people deal with stress and enhance creativity. You will be using this zentangle method to decorate the paper that you will use to create a cube sculpture. Begin by watching this video describing the art of ZENTANGLES:
Next, watch my video demos and tutorial:
PROCEDURES:
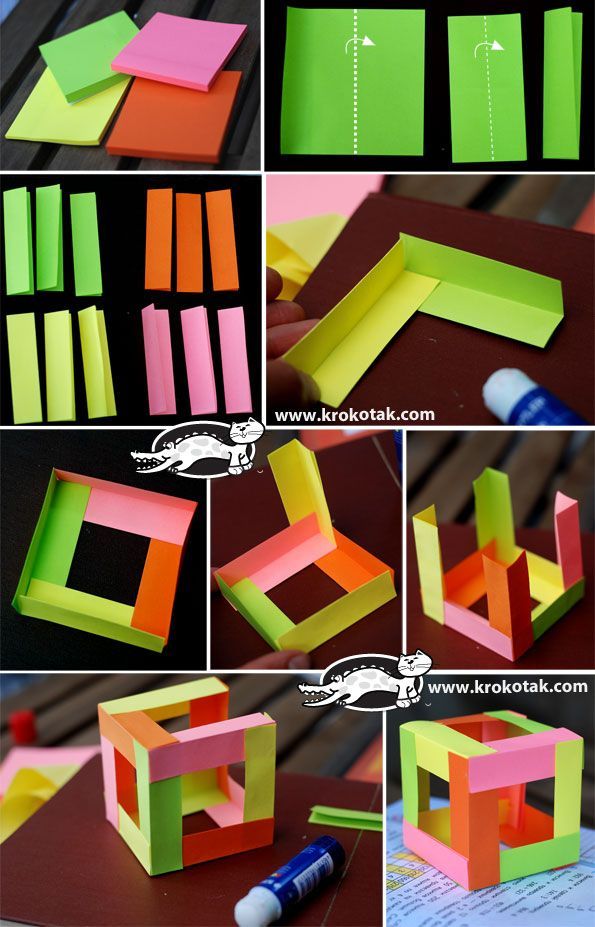
1. Decorate the front and back of 4 sheets of letter size paper with a zentangles pattern with any coloring materials you'd like (this may take some time.. Maybe dedicate some time each day for meditative doodling)
2. Hold your paper portrait style (tall). Use a ruler to measure 3 inches apart going down your paper.
3. Cut your paper into three 3 inch strips so each strip is 3 x 8.5 inches. Repeat this for each paper until you have 12 strips total
4. Carefully fold each strip long ways so they look like little hot dog buns
5. Arrange them into a square gluing each of the 4 corners together
6. Glue four more strips reaching up from each of those corners
7. Turn your structure to glue the 4 final strips completing the cube
(NOTE: if you are short on time, it is absolutely ok to just use colored construction paper to create your cube as show below)
Click here for visual instructions: https://www.makeandtakes.com/paper-cube-sculptures
SUBMISSION: DUE MAY 24
Please take a picture of your art. You may add your image to the shared google drive folder by clicking on the following links
MMS submit here
EHB submit here
***Having trouble submitting? Scroll to the very bottom of this page for a tutorial.
Please take a picture of your art. You may add your image to the shared google drive folder by clicking on the following links
MMS submit here
EHB submit here
***Having trouble submitting? Scroll to the very bottom of this page for a tutorial.
April 3- April 30
Due May 1
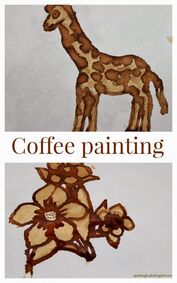
PROJECT: COFFEE PAINTING
Due May 1
PROJECT: COFFEE PAINTING
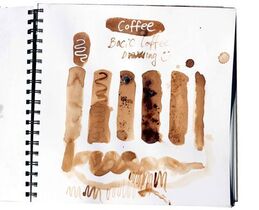
ASSIGNMENT: Use tints and shades to paint with coffee!
Materials: instant or very dark brewed coffee (chilled for safety); white paper; paintbrush (or toothbrush, qtip); water
Have you been driving your parents crazy? Maybe they’ve had to drink a bit more coffee than usual? Well, ask them to share! For this art project, you will be choosing a subject to paint entirely with coffee as your medium.
Click here to take a look at some of the incredible coffee and tea art from artist Giulia Bernardelli
PROCEDURES:
PRACTICE: Begin with a piece of scrap paper to practice with the coffee painting method. Beginning with just the black coffee, see what tone you get by painting just a simple line. Allow to dry for a moment and layer and overlap with a few more lines of just coffee. Did this darken your paint at all? Now add a touch of water to your paper, and paint with black coffee on top. How much lighter does this make your “paint”? By adding more and more water to your coffee painting, you will be “TINTING” your work. Think about how you can create a monochromatic (one color) picture using these light tints and dark shades of coffee.
SKETCH: Plan out your picture. Would you like to create a landscape of a mountain and trees, or an ocean view? Would you like to paint an animal with its interesting patterns? Would you like to paint a flower, a person, or a vehicle? You choose a subject that interests you! Just remember to keep your image large with simple details since you will be painting it all in. Lightly with a pencil, sketch out the image you would like to paint. Be sure these lines are light enough that they won’t be seen once you begin painting.
PAINT: Using the tints and shades you practiced with earlier, start painting in your image! I recommend starting with the darkest areas first using just coffee, and gradually adding the water as you need it to lighten up parts of your image. (note: you can either have one cup of coffee and another cup of water, and go back and forth as you need, or you can set up a few (I used 3) different premixed cups of coffee and water in varying shades of darkness to paint with. Decide what works best for you)
WARNING: First, make sure your coffee is chilled or cooled to room temperature before painting for safety. Do NOT drink your coffee.. Especially if it has caffeine! Your parents don’t need extra hyper children in the house!
Check out my videos below to watch my approach to this project
Sketching:
3 cup coffee mixing (light, medium, and dark):
Painting:
SUBMISSION:
submit a photo of your art to the shared google folder here
Be sure to label your submission with your name and class.
***Having trouble submitting? Scroll to the very bottom of this page for a tutorial.
submit a photo of your art to the shared google folder here
Be sure to label your submission with your name and class.
***Having trouble submitting? Scroll to the very bottom of this page for a tutorial.
Curriculum Overview: Our 5th grade artists are learning about exploratory art and using their creativity. Each of our projects will challenge their thinking strategies as well as their creative use for their fine motor skills.
5th graders also learn about the significance of art in our world, and the importance of creativity and art in careers, jobs, and every day life.
5th graders also learn about the significance of art in our world, and the importance of creativity and art in careers, jobs, and every day life.
Filler Activity for Students Finished with Posters
If you have finished your environmental posters, here is a simple activity that you can work on until the next cycle begins.
|
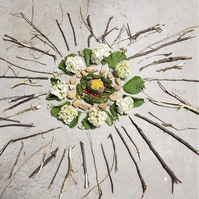
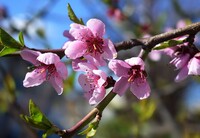
It's cherry blossom season! Cherry Blossoms are traditionally a Japanese species of blooming tree that produces flowers in the earliest days of spring. Its cheerful light pink blooms have become a popular tourist attraction in places like Washington D.C. where many of these cherry blossom trees line the pathways
Assignment: Follow along with the video tutorials below for drawing or painting cherry blossoms depending on the art resources you have available to you at home |
Draw with pencils |
Paint with acrylic/tempera |
Paint with watercolor |
|
|
|
|
Poster deadline is April 1st OR upon our return to school. Under the circumstance that we will continue our remote learning procedures beyond April 1st, your assignments will be presented below by grade level beginning A Day Friday, April 3.
Grades 3-5 Long Term Assignment
Cresskill Environmental Commission's Annual Poster Contest
Due April 1st
ASSIGNMENT: You will continue to work on your environmental posters for the CEC. The theme this year is "Using Your Voice to Demand Environmental Change" and we have discussed in depth about how you can create visual interpretations of this theme by artistically portraying the changes you would like to see to help improve the condition of our planet, or focusing on what could happen if we continue to neglect our planet. We've watched various videos and discussed important environmental issues that have been included for your reference below.
Guidelines and Areas of Focus:
Guidelines and Areas of Focus:
- Creativity of theme and interpretation
- Neatness, effort and precision
- visual portrayal of theme with minimal text
- Effective use of space with visually appealing images
- Successful use of materials of your choosing (crayon, pen, marker, pencil, paint, etc.)
- Completion and Submission of poster by deadline (tentatively 4/1/20)
|
|
|
|
|
Topic Guide:
| poster_essay_contest-2019-20_topic_guide.doc |
Critical Environmental Issues Discussed in Class:
- Pollution (air, water, land, noise)
- Climate change/ Global warming
- Carbon emissions/fossil fuels
- Reducing, reusing and recycling
- Energy conservation
- Water conservation
- Over-fishing
- Over-farming
- Deforestation/habitat destruction
- Endangered species/ loss of biodiversity
- Shortage of natural resources
- Plastic/styrofoam accumulation
- Increased flooding; storms; water levels
- Wild fires
- Waste disposal
- Litter
- Decrease in bee and pollinators population
- Destruction of coral reefs
- Urban sprawl (taking over natural land)
***IMPORTANT NOTE REGARDING ENVIRONMENTAL POSTERS:
Thank you to all the 3rd, 4th, and 5th grade students who completed their art posters for the Cresskill Environmental Commission. Although there will not be a formal award ceremony this year, the commission would still like to recognize the winning posters in a virtual ceremony. Due to the circumstances, we will be making this year's contest voluntary. If you would like your poster to be considered for the contest, please upload a picture of your poster to the appropriate link below. Be sure to rename your picture or file with your name and homeroom, or have your name and homeroom clearly written on the bottom front corner of your poster. If you have any questions, feel free to contact me at [email protected]. If you have difficulty submitting, please scroll to the bottom of this page for a tutorial.
Links for submission (Due Friday 5/15):
MMS 3rd Grade Posters
MMS 4th Grade Posters
MMS 5th Grade Posters
EHB 3rd Grade Posters
EHB 4th Grade Posters
EHB 5th Grade Posters
Project Submission Tutorial
|
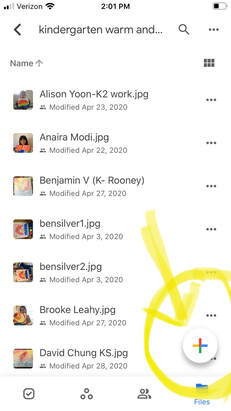
From iPhone
STEP 1: After you click on the project submission button, it will bring you to this screen on your iphone where you may see a list of already submitted projects in our shared folder. Click the large colorful plus sign on the bottom right corner of your screen.
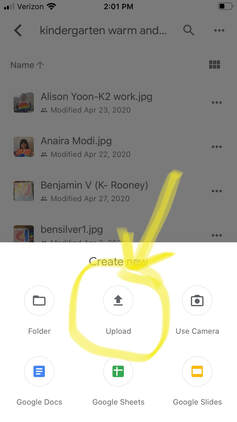
Step 2: Once you click the plus sign, a "Create New" menu will pop up. Click on "upload" and search for the photo of the project you want to submit. All set!
|
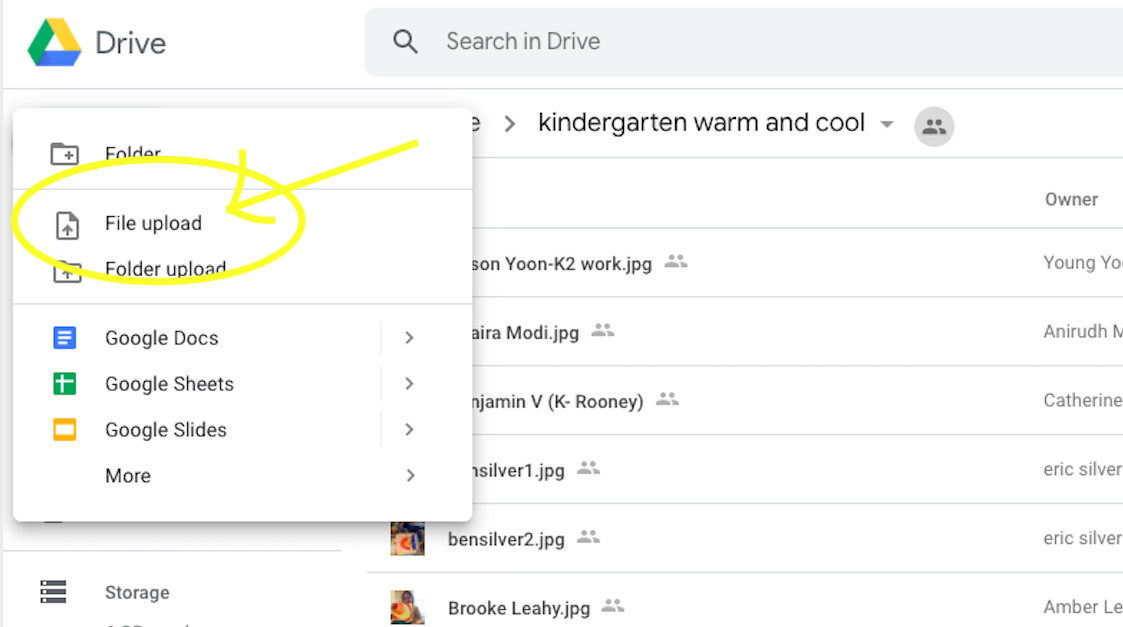
From laptop
Step 1: After you click on the project submission button, it will bring you to this screen on your laptop where you may see a list of already submitted projects in our shared folder. Click the colorful plus sign labeled "New" on the top left of your screen.

Step 2: Once you click the plus sign, click on "upload file" and search for the photo of the project you want to submit. All set!
|
Photo used under Creative Commons from Jocelyn777 Love Europe
